
Drywall Water Damage Repair Services in Spruce Grove, AB
Divine Drywall Spruce Grove provides professional drywall water-damage repair services for homeowners and business owners across Spruce Grove, Alberta. From ceiling leaks to full-wall saturation, our team restores damaged drywall with clean, reliable workmanship that blends seamlessly with your existing structure.
Water intrusion spreads quickly, softening the gypsum core, loosening fasteners, and trapping moisture that can lead to mould if left untreated. We follow a structured, proven repair process: cutting out compromised sections, applying proper patch backing, securing the new board, and rebuilding with mesh tape and setting compound to maintain strength and prevent future separation. We provide a restoration approach that respects both the materials in your home and the people living in it.
If you’re dealing with fresh water damage or lingering drywall issues from a past leak, call 587-415-5093 or fill out our online quote form to schedule your repair.
You can also learn more about our complete
drywall repair services before the next steps in your repair process.
Comprehensive Drywall Water Damage Repair Methods
Drywall water damage repair requires specialized techniques for different areas of your Spruce Grove residential or commercial space, from ceiling repairs addressing sagging and staining to comprehensive restoration that involves structural drying and material replacement.

Divine Drywall Spruce Grove (SP)

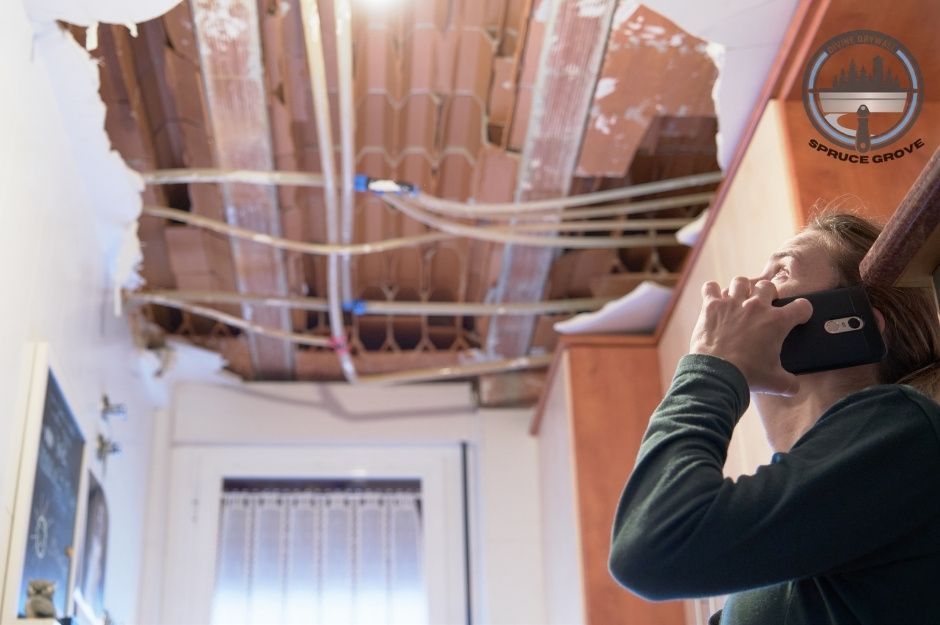
Repairing Water-Damaged Ceiling
Water-damaged ceilings present unique challenges that require immediate attention to prevent structural failure. Sagging occurs when drywall absorbs moisture and loses its structural integrity.
Some common ceiling water damage signs include:
- Sagging or drooping sections
- Brown or yellow water stains
- Bubbling paint or texture
- Visible mould growth
Our repair process begins with identifying the water source and addressing active leaks. We assess whether sections can be dried and repaired or need complete replacement.
Our repair methods vary by damage severity:
- Cut and patch the affected areas for minor staining
- Partial drywall replacement for moderate sagging
- Complete tear-out and replacement for severe damage
Proper structure drying prep ensures moisture levels return to normal before placing new drywall. This prevents future mould growth and material failure.
Drywall Water Damage Repair
Wall water damage typically appears as bubbling, staining, or soft spots in the drywall surface. The extent of damage depends on the duration of water exposure and the amount of moisture absorbed.
Our bubble wall repair involves cutting away damaged sections and replacing them with new drywall. Wet wall repair requires immediate moisture extraction to prevent damage from spreading to adjacent areas.
Our drywall water damage repair techniques include:
- Moisture testing with specialized equipment
- Removing damaged drywall sections
- Treating underlying framing if necessary
- Applying new drywall patches
The cut-and-patch method works for localized damage, whereas extensive water exposure requires tear-out and replacement. Our drywall repair ensures proper sealing and texture matching with existing surfaces.
Repairing Flooding-Damaged Drywall
Flooding damage repair involves the comprehensive restoration of drywall affected by standing water. This process requires water mitigation and tear-out to remove contaminated materials.
Our flooding-damaged drywall repair stages include:
- Water extraction and dehumidification
- Material removal of the damaged drywall and insulation
- Structure drying preparation and monitoring
- Reconstruction with new materials
Moisture damage repair extends beyond visible areas because water can travel through wall cavities and floor systems. Our moisture-detection equipment identifies hidden damage that could lead to future problems.
Following water damage, our drywall replacement follows specific protocols to ensure proper adhesion and prevent mould growth. This includes treating framing members and placing vapour barriers where required.
Leak-Damaged Drywall Repair
Leak-damage drywall repair addresses ongoing water intrusion caused by plumbing failures, roof leaks, or building envelope breaches. Unlike flooding damage, leak damage often develops gradually.
Typical leak damage locations:
- Around windows and doors
- Beneath plumbing fixtures
- Along exterior walls
- Under the HVAC equipment
Water stain removal requires treating both the visible staining and the underlying moisture damage. Surface treatments alone will not prevent stains from bleeding through new paint or primer.
Our repair process involves:
- Source identification and repair
- Moisture level assessment
- Damaged material removal
- Primer application with stain-blocking properties
Wet ceiling and wall repair from leaks often requires partial reconstruction to ensure structural integrity. Our assessment determines whether repair or replacement will provide the most effective long-term solution.
Drywall Water Restoration Process and Techniques
Our restoration process uses a systematic approach to remove moisture damage and restore structural integrity. Our techniques range from surface-level stain removal to complete material replacement, depending on the severity of the damage.
Drywall Water Stain Removal
Water stains on ceilings and walls require specific treatment methods based on stain type and surface material. We have different approaches for fresh stains versus set-in discolouration.
Surface stains on painted drywall often respond to gentle cleaning solutions. A mixture of warm water and mild detergent removes the light water marks without damaging the underlying paint.
Stubborn stains need stronger treatment. Hydrogen peroxide or specialized stain-blocking primers prevent bleed-through when you repaint the affected area.
We assess whether the stain has penetrated the drywall paper or just affected the paint layer. This determines if cleaning alone will work or if primer application is necessary.
Our preparation steps include protecting the surrounding areas with plastic sheeting. The damaged surface is thoroughly cleaned and dried before any stain-blocking products are applied.
Cut and Patch Water-Damaged Drywall
This technique addresses localized water damage without replacing entire drywall sections.
Our assessment criteria include damage size, depth of moisture penetration, and structural integrity of the surrounding drywall. Patches are most effective for areas smaller than 12 inches in diameter.
We cut out the damaged section using a utility knife or drywall saw. The cut follows the shape that allows proper patch placement and blending.
Drywall Tear-Out and Replacement
Extensive water damage requires the complete removal and replacement of affected drywall sections. We use this approach when moisture has saturated materials or compromised the structure.
Damage indicators that require tear-out include sagging ceilings, soft or crumbling drywall, visible mould growth, and persistent moisture readings.
We remove damaged materials systematically. This includes cutting through paint and joint compound to access fasteners and remove entire sheets cleanly.
Safety protocols involve containing dust and debris with plastic barriers. Our team wears protective equipment to prevent exposure to the potential mould or contaminated materials.
Our replacement process includes matching existing wall thickness and ensuring proper insulation placement where applicable.
Drywall Water Mitigation Tear-Out
Our emergency procedure quickly removes water-damaged materials to prevent further damage. Immediate action is needed to stop mould growth and structural deterioration.
Time sensitivity makes this process critical within 24-48 hours of water exposure. Rapid material removal prevents secondary damage to unaffected areas.
Our team removes all saturated drywall, insulation, and trim materials. We cut removal lines in undamaged areas to ensure complete moisture elimination.
Moisture detection tools guide the tear-out boundaries. Our team uses meters to identify exactly where dry materials meet wet materials.
Why Choose Divine Drywall Spruce Grove for Drywall Water Damage Repair
Divine Drywall Spruce Grove specializes in comprehensive water damage repair services throughout Spruce Grove, Alberta’s residential homes and commercial buildings. We have 10+ years of experience handling everything from initial drywall water-damage assessment and structural drying to complete drywall replacement, ensuring your property is restored to its original condition.
Our team addresses all drywall water damage issues, including sagging ceilings, bubbling wall paint, visible water stains, or moisture-damaged drywall. Our water damage restoration process involves multiple stages, including moisture removal, structural preparation, and careful material replacement to prevent future issues.
Call us today at 587-415-5093 or fill in our quote form for free estimates and to schedule your project.
