
Bathroom Installation in Spruce Grove, AB
Divine Drywall Spruce Grove delivers professional bathroom installation drywall services for homeowners and businesses throughout Spruce Grove, Alberta. From full bathroom remodels to targeted wet-area upgrades, our team installs moisture-resistant and mould-resistant boards that stand up to steam, splashing, and constant humidity.
Bathrooms demand precision and the right materials. Our installers use moisture-resistant gypsum, cement board, sanding mesh, and trowel-work finishing techniques to build sturdy bases for tile, paint, and fixtures. We handle cutouts around plumbing valves, fan vents, lighting, and electrical boxes while ensuring proper vapour barriers and clean sealing at every joint. Even tight spaces—like small ensuites or powder rooms—are finished with smooth transitions and durable surfaces designed for long-term protection.
Whether you’re renovating a shower surround, updating ceilings, or completing a full bathroom build-out, Divine Drywall Spruce Grove ensures every board is fitted, sealed, and finished to withstand the demands of a high-humidity environment. Call 587-415-5093 or continue to our parent page: Bathroom Drywall Services.
Divine Drywall Spruce Grove (SP)

Key Bathroom Installation Services by Divine Drywall Spruce Grove
Divine Drywall Spruce Grove specializes in bathroom installations that protect against moisture damage while ensuring proper construction in high-humidity environments. Their services include specialized board installations, moisture barriers, and professional wall systems designed for wet areas.
Bathroom Drywall Install
You need proper drywall installation in your bathroom to create a stable foundation for tiles, paint, and fixtures. Divine Drywall Spruce Grove handles complete bathroom drywall projects using techniques specifically designed for wet environments.
The installation process involves measuring and cutting panels to fit around plumbing fixtures, electrical outlets, and ventilation systems. Proper spacing and fastening prevent future issues with sagging or cracking.
Standard bathroom drywall installation includes:
- Precise measurements around fixtures
- Proper fastener placement every 12 inches
- Sealed joints and corners
- Smooth finish preparation
Your bathroom requires different drywall thicknesses depending on the area. Wall installations typically use 1/2-inch thickness, while ceiling applications may require 5/8-inch panels for added support.
The team ensures all cuts are clean and precise around toilet flanges, shower valves, and electrical boxes. This attention to detail prevents gaps that could allow moisture penetration behind the walls.
Moisture-Resistant Board Install
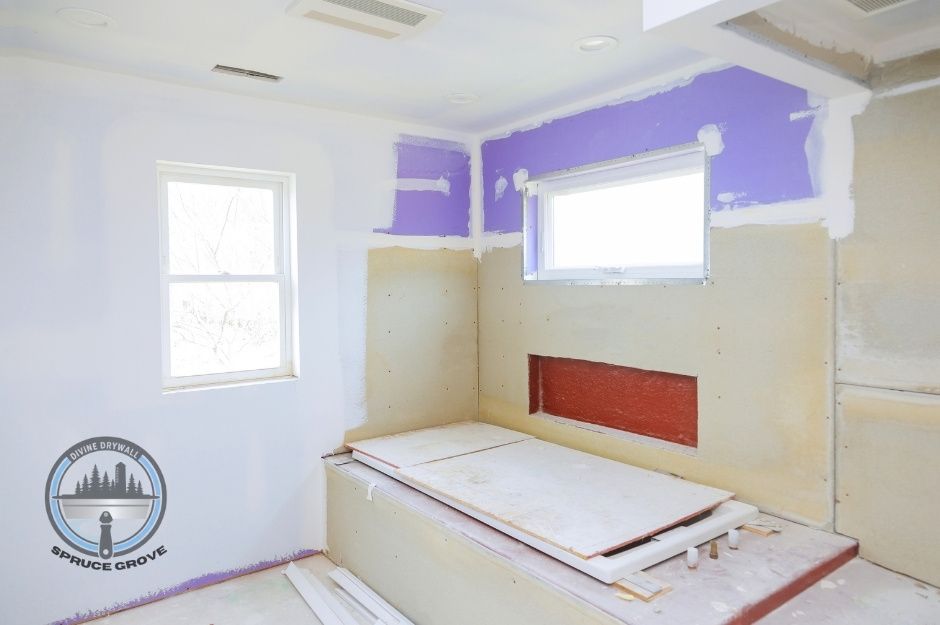
You benefit from moisture-resistant boards that contain special additives to resist water absorption and humidity damage. These green-colored boards provide superior protection compared to standard drywall in bathroom environments.
Moisture-resistant installation focuses on critical areas where water exposure is highest. The boards feature a treated core that maintains structural integrity even when exposed to steam and occasional water contact.
Installation locations for moisture-resistant boards:
- Areas within 3 feet of bathtubs
- Shower surrounds up to ceiling height
- Behind bathroom sinks and vanities
- Ceiling areas above tubs and showers
Your installation includes proper sealing of all seams and joints using appropriate compounds. The boards must be installed with correct spacing from flooring to prevent wicking moisture from below.
These specialized boards cost more than standard drywall but provide essential protection against warping, softening, and deterioration. The investment protects your bathroom structure for years.
Mold-Resistant Board Install
You receive mold-resistant boards that contain antimicrobial additives to prevent mold and mildew growth in high-humidity conditions. These boards provide the highest level of protection for bathroom installations.
The mold-resistant core technology actively inhibits fungal growth even when moisture levels fluctuate. This protection extends throughout the entire thickness of the board, not just surface treatments.
Key features of mold-resistant boards:
- Antimicrobial additives throughout the core
- Enhanced moisture resistance
- Purple-colored face for easy identification
- Compatible with standard installation methods
Your mold-resistant installation requires the same techniques as standard drywall but with additional attention to sealing and finishing. Proper installation prevents moisture accumulation behind the boards.
These boards excel in bathrooms with limited ventilation or frequent use. The mold-resistant properties maintain air quality and prevent health issues associated with fungal growth.
Professional installation ensures maximum effectiveness of the mold-resistant properties through proper handling and sealing techniques.
Bathroom Wall Installation
You get complete bathroom wall systems that combine proper framing, insulation, vapor barriers, and finish materials. Divine Drywall Spruce Grove coordinates all wall components for optimal performance.
Wall installation begins with proper framing to support fixtures and provide adequate space for plumbing and electrical systems. Insulation placement prevents condensation issues within wall cavities.
Complete wall installation components:
- Structural framing assessment
- Insulation and vapor barrier placement
- Appropriate drywall type selection
- Professional finishing and sealing
Your bathroom walls require different approaches based on their proximity to water sources. Shower and tub areas receive the highest level of moisture protection, while other areas use standard techniques.
The installation process includes coordination with plumbing and electrical trades to ensure proper placement of utilities. All penetrations are sealed to prevent moisture infiltration.
Wall height installations extend to appropriate levels based on fixture placement and tile installation requirements. Proper planning prevents costly modifications during later construction phases.
Specialized Wet-Area Drywall Solutions
Wet areas in bathrooms demand specific moisture-resistant materials and precise installation techniques to prevent water damage and mold growth. Your shower zones, tub surrounds, and high-humidity spaces require specialized board types and waterproofing methods.
Shower-Area Board Install
Moisture-resistant boards are essential for shower installations where direct water contact occurs daily. You need cement backer board or fiber cement panels in these areas rather than standard drywall.
The installation process requires proper membrane application behind the boards. Your contractor must seal all joints with waterproof tape and appropriate sealants before tile installation.
Key considerations for shower areas:
- Board thickness of 1/2" minimum
- Proper fastener spacing every 8" on center
- Waterproof membrane coverage extending 6" beyond shower boundaries
- Sloped installation toward drainage points
Vapor barriers get installed between studs and boards to prevent moisture penetration into wall cavities. Your shower area needs continuous protection from floor to ceiling with no gaps in coverage.
Tub Surround Board Install
Tub surrounds face constant moisture exposure and require specialized installation techniques. Cement backer board provides the best foundation for tile work around bathtubs.
You need boards installed with 1/4" gap above the tub flange to allow for expansion. The gap gets sealed with appropriate caulking materials after installation completion.
Installation requirements include:
- Boards cut to fit precisely around plumbing fixtures
- Mesh tape applied to all seams
- Waterproof adhesive used at board joints
- Proper support blocking behind boards at fixture mounting points
Your tub surround installation must account for access panels and fixture mounting locations. Boards require additional reinforcement where grab bars or accessories will be mounted.
High-Humidity Area Drywall
Bathroom areas outside direct water zones still need moisture-resistant materials due to steam and humidity exposure. Green board or purple board drywall provides adequate protection for these spaces.
Ventilation planning affects your drywall selection and installation methods. Areas with poor air circulation need more robust moisture protection than well-ventilated spaces.
Humidity protection strategies:
- Mold-resistant drywall compound application
- Primer and paint systems designed for high-moisture areas
- Proper joint sealing to prevent moisture infiltration
- Strategic placement of vapor barriers
Your high-humidity installations require careful attention to joint finishing. Standard joint compound can fail in moist conditions, so moisture-resistant products are necessary for long-term durability.
Comprehensive Bathroom Assembly and Board Hanging
Bathroom assembly requires specialized moisture-resistant materials and precise installation techniques to create durable, long-lasting walls and ceilings. Professional board hanging in wet environments demands attention to sealing, spacing, and proper fastening methods to prevent water damage and ensure structural integrity.
Bathroom Ceiling Installation
Installing ceiling drywall in bathrooms requires moisture-resistant gypsum board rated for high-humidity environments. You need green board or cement board that can withstand steam and condensation without warping or developing mold.
Proper ventilation planning happens before installation begins. Your ceiling must accommodate exhaust fan placement and any recessed lighting fixtures. The board requires ⅝-inch thickness for most residential applications to prevent sagging from moisture weight.
Fastener spacing becomes critical in bathroom ceilings:
- Screws placed every 8 inches along joists
- ¼-inch gap maintained around light fixtures
- Vapor barrier installed behind board when required by local codes
Sealing all joints with appropriate caulk prevents moisture infiltration. You should apply primer specifically designed for bathroom environments before any finish work begins.
Interior Bathroom Board Hanging
Board hanging in bathroom interiors follows specific moisture-protection protocols that differ from standard drywall installation. Cement board or moisture-resistant gypsum board provides the foundation for tile and other wet-area finishes.
Your installation starts from the bottom up, leaving a small gap above the tub or shower pan. This prevents direct water contact with the board edges. Proper fastening requires corrosion-resistant screws driven flush but not breaking the paper surface.
Behind shower and tub areas, you need:
- Waterproof membrane application
- Appropriate adhesive for your chosen board type
- Sealed joints at all intersections
Board edges require sealing with moisture-resistant joint compound. You must prime all surfaces before applying any finish materials to ensure proper adhesion and longevity.
Bathroom Panel Installation
Panel installation in bathrooms involves specialized wall systems designed for wet environments. Tile backer board, PVC panels, and fiber cement panels each require specific installation techniques and fasteners.
Your panel selection depends on the intended finish material. Ceramic tile requires cement board backing, while direct-finish panels may use PVC or composite materials. Proper layout ensures panels align with plumbing fixtures and minimize cuts around obstacles.
Installation requirements include:
- Level substrate preparation
- Appropriate adhesive application
- Mechanical fastening every 8 inches
- Sealed joints and penetrations
Panel edges need protection from direct water exposure. You should install proper trim pieces and gaskets around all penetrations to maintain the moisture barrier integrity.
Bathroom Assembly Installation
Complete bathroom assembly coordinates all wall and ceiling components into a unified moisture-resistant system. Your assembly process integrates structural framing, utilities, moisture barriers, and finish substrates.
Assembly sequencing follows building code requirements:
- Framing and utility rough-in completion
- Moisture barrier installation where required
- Board or panel installation and fastening
- Joint sealing and primer application
Tight tolerance work around fixtures demands precise measuring and cutting. You need specialized tools for clean cuts around pipes, electrical boxes, and other penetrations without compromising the moisture barrier.
Quality control checks verify proper fastening, gap spacing, and moisture protection before any finish work begins. Your completed assembly must pass inspection requirements and provide a solid foundation for final bathroom finishes.
Custom and Commercial Bathroom Projects
Divine Drywall Spruce Grove handles specialized bathroom installations that require expert techniques for commercial environments, renovation projects, and challenging confined spaces. These projects demand precise moisture control and professional-grade installation methods.
Commercial Bathroom Drywall
Commercial bathroom installations require moisture-resistant and mold-resistant board systems that meet building codes for high-traffic facilities. You need materials that withstand constant humidity and frequent cleaning with industrial-grade products.
Your commercial project benefits from these specialized approaches:
- Heavy-duty moisture barriers behind all wet areas
- Reinforced mounting systems for commercial fixtures
- Code-compliant ventilation integration during installation
- High-durability joint compounds resistant to cracking
Commercial spaces like offices, restaurants, and retail locations demand faster project completion. Divine Drywall Spruce Grove coordinates installations around your business hours to minimize disruption.
The installation process focuses on long-term performance rather than just initial appearance. You receive properly sealed joints, reinforced corners, and moisture-resistant board placement that prevents future maintenance issues.
Bathroom Renovation Install
Renovation projects present unique challenges when installing new drywall around existing plumbing and electrical systems. You often work with uneven surfaces and modified layouts that require custom fitting techniques.
Your renovation involves these critical steps:
Phase Requirements
Demolition coordination Careful removal around utilities
Surface preparation Leveling and moisture testing
Custom fitting Precise cuts around existing fixtures
Integration Seamless connection to existing walls
Moisture-resistant board installation becomes more complex when connecting new sections to older construction. You need proper vapor barriers and seamless transitions that prevent water infiltration.
Renovation timelines depend on your existing conditions. Projects with good structural conditions complete faster than those requiring extensive preparation work.
Tight-Space Drywall Install
Powder rooms and compact bathroom layouts require specialized installation techniques for maneuvering materials and tools in confined areas. You face challenges with standard drywall sheets that don't fit through narrow doorways or around tight corners.
Custom cutting and piecing strategies allow proper installation without compromising moisture protection. Smaller sections require more joints, but proper sealing maintains water resistance.
Your tight-space project involves:
- Pre-cutting materials to fit through access points
- Strategic joint placement for maximum strength
- Specialized tool usage for cramped working conditions
- Careful moisture barrier installation despite limited access
Corner installations in tight spaces demand precise measuring and cutting. You receive properly fitted boards that maintain structural integrity while accommodating space limitations.
