
Attic Installation in Spruce Grove, AB
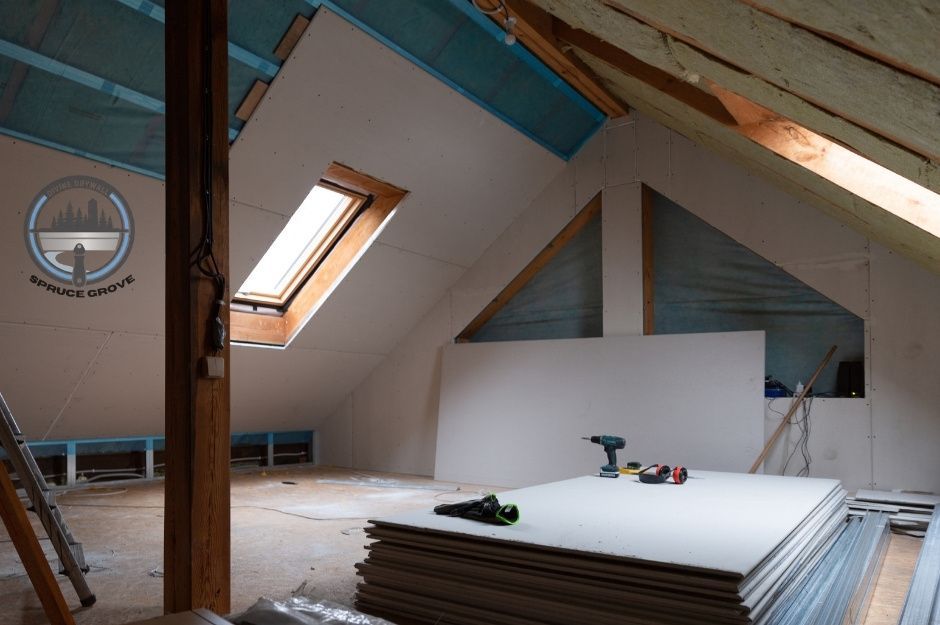
Divine Drywall Spruce Grove delivers professional attic drywall installation for homeowners and businesses throughout Spruce Grove, Alberta. Whether you’re finishing an existing attic or converting raw space into a livable room, our team handles the tight angles, sloped ceilings, and limited access points that make attic projects uniquely challenging.
Attic installations demand a higher level of precision than standard rooms. Our installers use corner bead, T-squares, screw guns, and specialized lifting equipment to work cleanly in confined spaces while maintaining strong fastening along every slope and intersection. We plan around insulation, vapour barriers, and ventilation clearances before hanging a single sheet, ensuring the structure stays stable and the finish stays smooth—no shifting seams or stress cracks down the road. Every board is measured, cut, and staged with care so the final surface ties naturally into your renovation flow.
If you want your attic finished right the first time, we’re ready to help. Call 587-415-5093 or continue to our parent page: Attic Installation Drywall Services.

Divine Drywall Spruce Grove (SP)
Attic Installation Services in Spruce Grove
Professional attic installation requires specialized techniques for working in confined spaces with angled surfaces and limited access. Divine Drywall Spruce Grove delivers comprehensive solutions for tight-space installations, sloped surfaces, and complex attic configurations.
Attic Drywall Install Solutions
Attic drywall installation demands precise measurements and specialized cutting techniques to fit around roof trusses and irregular angles. You need contractors who understand how to navigate tight spaces while maintaining consistent board placement and secure fastening.
Key Installation Considerations:
- Moisture barriers must be properly positioned before drywall placement
- Ventilation clearances require careful planning around existing systems
- Access limitations necessitate strategic material staging and tool selection
Divine Drywall Spruce Grove uses specialized equipment designed for confined spaces. Their team pre-cuts materials when possible to minimize on-site adjustments. You benefit from reduced installation time and cleaner finishes.
The installation process includes thorough insulation coordination. Proper sequencing prevents compression of existing insulation while ensuring adequate coverage. Temperature fluctuations in attic spaces require specific fastener types and spacing to prevent future movement or cracking.
Attic Board Hanging Methods
Board hanging in attic spaces requires modified techniques compared to standard room installations. You face challenges with angled surfaces, limited headroom, and awkward positioning that demand specialized approaches.
Professional Hanging Techniques:
- Temporary bracing systems support boards during fastening
- Specialized lifts position materials safely in confined areas
- Strategic fastening patterns accommodate thermal expansion
Sloped ceiling installation begins at the highest point and works systematically downward. This prevents boards from shifting during installation and ensures proper alignment. You receive consistent seam placement that simplifies finishing work.
Material handling becomes critical in tight attic spaces. Contractors must plan board sizes and cutting locations to minimize waste while ensuring structural integrity. Proper support during installation prevents stress fractures that could compromise long-term performance.
Attic Wall Installation Expertise
Attic wall installation involves both vertical surfaces and complex intersections with sloped ceilings. You encounter unique challenges with measuring, cutting, and fitting boards around existing structural elements.
Installation Process Steps:
Phase Focus Area Key Requirements
Planning Measurements Precise angles and clearances
Preparation Material staging Accessible positioning
Installation Board placement Secure fastening methods
Finishing Seam treatment Consistent joint spacing
Knee walls require special attention to structural attachment points. Your contractor must identify appropriate framing members while working around insulation and mechanical systems. Proper fastening prevents future movement that could crack finished surfaces.
Corner installations demand precise cutting and fitting techniques. Complex angles where walls meet sloped ceilings require careful template creation. You receive clean intersections that enhance the finished appearance.
Attic Ceiling Installation Process
Attic ceiling installation presents the most challenging aspects of attic drywall work. You deal with overhead positioning, gravity concerns, and limited mobility that require experienced contractors and specialized equipment.
Vaulted attic installation demands systematic approaches starting from structural attachment points. Proper support systems prevent sagging while maintaining consistent spacing. Your installation benefits from professional lifting equipment designed for overhead work.
Critical Success Factors:
- Adequate bracing during installation prevents board movement
- Proper fastener selection ensures long-term structural integrity
- Seam planning minimizes visible joints in finished surfaces
Installation sequencing becomes crucial for ceiling work. Contractors must coordinate with existing mechanical systems while maintaining proper clearances. You receive installations that accommodate future access needs without compromising structural integrity.
Commercial attic installations require additional considerations for building codes and fire ratings. Professional contractors understand these requirements and ensure compliance throughout the installation process.
Specialized Attic Construction and Renovation
Attic construction requires specialized techniques for irregular spaces, including proper framing methods for sloped surfaces and advanced installation procedures for vaulted configurations. Professional contractors address unique challenges like limited access points and complex angles while ensuring structural integrity.
Attic Renovation Install Techniques
Modern attic renovation install methods focus on maximizing space efficiency while addressing structural challenges. You need proper vapor barriers installed before any drywall work begins to prevent moisture issues.
Critical Installation Steps:
- Assess existing framing and reinforce weak points
- Install proper insulation services before drywall application
- Use moisture-resistant materials in high-humidity areas
- Plan electrical and HVAC routing during initial phases
Your contractor should evaluate load-bearing requirements for new walls. This assessment determines whether additional structural support is necessary. Most attic conversions require updated electrical systems to meet current building codes.
Professional installers use specialized tools for tight-space work. These include compact drills, angled screwdrivers, and flexible measuring devices. The installation sequence matters significantly in confined attic spaces where maneuvering large sheets becomes challenging.
Attic Framing and Board Procedures
Proper framing creates the foundation for successful drywall installation in attic spaces. You must ensure all framing members are level and properly spaced at 16 or 24 inches on center.
Standard Framing Requirements:
- 2x4 or 2x6 lumber for wall studs
- Proper header installation above openings
- Blocking between studs for drywall edges
- Fire blocking as required by local codes
Board hanging in attic spaces requires careful planning due to access limitations. Your installer should measure and cut sheets before carrying them into the attic. Pre-cutting reduces waste and minimizes handling in cramped quarters.
Fastener selection impacts long-term performance. Use appropriate screw lengths that penetrate framing members by at least 1 inch. Drywall repair becomes necessary when fasteners miss framing or create surface dimples.
Sloped Ceiling Installation
Sloped ceiling installation presents unique challenges requiring specialized measurement and cutting techniques. You need experienced installers who understand angle calculations and proper joint placement.
Key Installation Considerations:
- Measure angles precisely using digital angle finders
- Plan seam locations to minimize visible joints
- Use flexible corner beads for irregular angles
- Account for settling movement in older homes
Your installer should start with the largest uncut sheets possible. This approach minimizes joints and creates cleaner finished surfaces. Gravity works against installers on steep slopes, requiring proper bracing and support systems.
Joint compound application requires modified techniques for sloped surfaces. Multiple thin coats work better than single thick applications. Professional installers often use specialized tools designed for overhead and angled work.
Vaulted Attic Installation
Vaulted attic installation combines the challenges of height and angle in a single project. You need contractors with high-reach equipment and experience working at elevated positions safely.
Safety and Technical Requirements:
- Scaffolding or specialized platforms for safe access
- Fall protection equipment for workers
- Proper ventilation to prevent overheating
- Dust control measures for enclosed spaces
Peak installations require careful planning for material handling. Your contractor should use mechanical lifts or pulley systems for heavy sheets. Hand-carrying materials up ladders creates safety risks and potential damage.
Ridge beam connections need special attention in vaulted installations. These critical junction points require precise cuts and proper support during installation. Weather protection becomes important if roof work coincides with interior finishing.
Professional installers coordinate with insulation services providers to ensure proper sequencing. Insulation must be complete before drywall installation begins, but access points may need temporary removal during the process.
Challenging Attic Installations
Attic drywall projects present unique obstacles including restricted workspace dimensions, elevated installation points, and structural modifications for living space conversions. These installations require specialized techniques and equipment to achieve professional results in confined environments.
Tight-Space Drywall Install
Working in cramped attic areas demands modified installation techniques and compact tools. Standard 12-foot drywall sheets often cannot maneuver through tight spaces, requiring you to use smaller 8-foot or custom-cut panels.
Key considerations for tight-space installations:
- Pre-cut drywall pieces to fit through access points
- Use lightweight materials to reduce handling difficulty
- Position materials strategically before beginning installation
- Install proper lighting to illuminate work areas
Your installer must work in awkward positions while maintaining quality standards. Knee pads and proper ventilation become essential for worker comfort and safety. The installation process takes longer due to restricted movement and frequent repositioning of materials.
Professional crews often work in pairs to pass materials efficiently through confined spaces. This approach reduces physical strain and speeds up the overall installation timeline.
High-Reach Board Installation
Sloped ceilings and vaulted attic spaces require specialized lifting equipment and scaffolding systems. Standard ladders cannot provide stable platforms for overhead drywall installation at steep angles.
Essential equipment for high-reach installations:
- Adjustable scaffolding - Provides stable work platform
- Drywall lifts - Mechanical support for ceiling panels
- Extension handles - Reach tools for screwing and finishing
- Safety harnesses - Fall protection on steep slopes
Measuring and cutting accuracy becomes critical when working at height. Mistakes require additional trips up scaffolding, increasing labor costs and project duration. Your contractor must account for ceiling angles when calculating material quantities and cutting patterns.
Proper drywall installation in high-reach areas affects insulation effectiveness, potentially impacting your energy bills through air leakage gaps.
Attic Conversion Installation
Converting raw attic space into livable rooms requires comprehensive framing and drywall systems beyond basic installation. Your project involves structural modifications, insulation integration, and code compliance requirements.
Conversion installation components:
- Subfloor framing and decking
- Wall framing for room divisions
- Ceiling attachment points
- Electrical and plumbing accommodations
Attic conversions demand precise measurements to maximize headroom in sloped ceiling areas. Building codes typically require minimum ceiling heights of 7 feet over 50% of the floor area.
Your installer coordinates with other trades to sequence electrical rough-in before drywall installation. Proper vapor barriers and insulation placement prevent condensation issues that damage drywall over time.
The conversion process transforms unused storage space into functional living area, adding square footage and property value to your home.
Commercial and Advanced Attic Solutions
Commercial attic installations require specialized techniques for larger spaces, complex assemblies, and professional-grade panel systems. Advanced build-out installations transform basic attic frameworks into functional commercial or residential spaces through systematic installation processes.
Commercial Attic Install
Commercial attic installations involve large-scale drywall projects in office buildings, warehouses, and retail spaces. These projects require coordinated scheduling to minimize business disruption.
You'll need specialized equipment for high-reach installations in commercial spaces.
Commercial projects often feature:
- Fire-rated drywall systems for safety compliance
- Acoustic panels for sound control
- Moisture-resistant materials for HVAC areas
- Access panel integration for utilities
Divine Drywall Spruce Grove handles commercial timing requirements efficiently. Most commercial installations occur during off-hours or weekends. Project coordination involves multiple trades working simultaneously.
Commercial attic spaces typically span larger areas than residential projects. This requires careful material planning and staging. Crane access or material lifts become essential for upper-level installations.
Attic Assembly Installation
Attic assembly installation focuses on pre-fabricated panel systems and modular components. This approach speeds installation while maintaining quality standards.
Assembly methods include connecting prefabricated wall sections and ceiling panels. You benefit from reduced on-site cutting and waste. Factory-cut panels ensure precise fits and cleaner installations.
Key assembly components:
- Prefabricated wall panels
- Ceiling tile systems
- Modular framing sections
- Integrated utility channels
Assembly installations work well for repetitive layouts like apartment complexes or office suites. The systematic approach reduces labor time significantly. Quality control improves through factory preparation.
Installation crews focus on positioning and securing rather than measuring and cutting. This efficiency translates to cost savings for property owners.
Attic Panel Installation
Panel installation involves specialized drywall products designed for attic environments. These panels handle temperature fluctuations and structural movement better than standard drywall.
You'll encounter different panel types based on application needs. Moisture-resistant panels work in humid conditions. Fire-rated panels meet commercial building codes. Acoustic panels reduce sound transmission.
Installation techniques vary by panel type:
Panel Type Installation Method Special Requirements
Standard Traditional screws 16" centers
Moisture-resistant Corrosion-resistant fasteners Vapor barriers
Fire-rated Specific screw patterns Certified installation
Acoustic Adhesive backing Sound isolation
Panel edges require proper sealing to maintain performance characteristics. Joint treatment follows manufacturer specifications exactly.
Attic Build-Out Install
Build-out installations convert raw attic space into finished rooms or storage areas. This comprehensive process includes framing, insulation coordination, and complete drywall installation.
Structural considerations guide build-out planning. You must verify floor load capacity before installation. Ceiling height requirements affect design options.
Build-out phases include:
- Framing installation for walls and ceilings
- Utility rough-in coordination
- Insulation placement around new walls
- Drywall installation and finishing
Sloped rooflines create installation challenges requiring custom cutting techniques. Knee walls need careful measurement for proper fit. Access considerations affect material delivery methods.
Divine Drywall Spruce Grove coordinates with other trades during build-out projects. Electrical and plumbing installations must complete before drywall work begins. HVAC considerations affect wall placement decisions.
